Website Design
WordPress to Webflow: Step-by-step Migration Guide
Written by
Jordan Richards
Published on
June 22, 2023
WordPress, known for its wide-ranging functionality and customisation options, has long been the go-to platform for website creation. Yet, there comes a time when even the most reliable platforms are surpassed by something better.
Enter Webflow, a platform that takes what WordPress offers and pushes the possibilities even further. Yes, both will get you from A to B, but with Webflow, the journey becomes more efficient, smoother, and even exciting.
At RCCO, we believe the migration from WordPress to Webflow is more than just a data transfer. It's an opportunity to optimise your platform, turbocharge its functionality, streamline content management, and amplify SEO capacity. More importantly, it's the key to unleashing your brand’s true potential online!
In this article, we'll simplify this transition for you. We’ll guide you through the steps of migrating from WordPress to Webflow and empower you to create an enhanced online experience for your brand.
The decision to migrate from WordPress to Webflow can stem from various factors. While WordPress has served as a trusted platform for many, Webflow presents many additional capabilities that can significantly enhance your website's quality, control, and flexibility. Let's understand the key reasons behind the migration:
WordPress, although functional, often constricts the creative freedom of designers. Its reliance on themes and plugins for design elements can limit the potential for unique customisation.
On the other hand, Webflow is like a digital canvas that provides you with unrestricted design freedom. Its robust and intuitive design tools allow you to construct a bespoke website that truly mirrors your brands essence and individuality.
Relying on third-party hosting can introduce potential security risks. With various components of your website distributed across different platforms, comprehensive security may become challenging.
For example, you might have to use different security plugins for each website component. Webflow, however, integrates hosting into its platform. Centralising your site on Webflow's AWS-based global CDN that helps you gain improved loading speeds with robust security measures.
Maintaining and updating a WordPress site can feel like a game of technical tug-of-war. The updates often require input from developers or a thorough understanding of the platform. Webflow revolutionises this aspect. You can make the changes as effortlessly as adjusting text on a canvas and clicking 'publish'.
Moreover, you can conveniently store all of your content - such as your website, landing pages, blog, and help centre - within a single project in Webflow.
The ability to construct extensive, unique component libraries also speeds up the creation of new pages. At RCCO, we have built extensive, unique component libraries to give our client's marketing teams pre-built branded blocks. This allows them to rapidly assemble new pages as they only need to focus on updating the content and not the site's structure.
A key advantage of migrating to Webflow is the platform's intrinsic Search Engine Optimisation (SEO) capabilities.
While WordPress may require the integration of external plugins to achieve effective SEO, Webflow comes packed with SEO tools ready for use right out of the box. Setting up technical SEO is also easy and mostly fine-tuned right from the start. The fast pace at which you can publish new pages and content helps you enhance content SEO.
Migration from WordPress to Webflow is a process that requires careful planning and meticulous execution. While the procedure is straightforward, it involves several technical steps, each of which contributes to the successful transition of your website. It can be categorised into three primary stages - Pre-Migration, Migration, and Post-Migration. Let's delve into each of these phases:
The pre-migration phase sets the groundwork for your move to Webflow. In this stage, the essential foundation for a smooth transition is established.
Sitemap analysis involves taking stock of your current WordPress website. It’s where you identify all pages, their hierarchy, and their interconnections. Understanding the structure of your existing website will guide you in replicating or improving the arrangement in Webflow.
A staging site serves as your sandbox, where you can safely experiment and plan the layout and design of your new Webflow site without affecting your live WordPress website. It's a crucial step to visualise and troubleshoot potential design issues.
You need to identify every page and meta tag on your WordPress site for transfer to Webflow. This will ensure the integrity of your SEO efforts and the continuity of your website's visibility on search engines.
The migration phase is the heart of the process, where content is transferred from WordPress to Webflow. This includes text, images, SEO components, and other site elements.
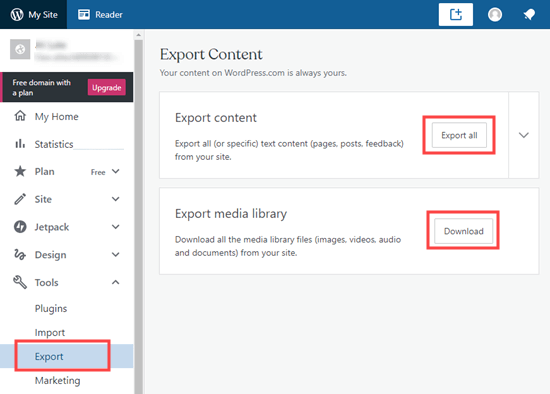
Using WordPress's built-in export tool, you can easily download your website's content, including pages, posts, and media.
With the exported WordPress content, you can import it into Webflow using the import tool, which allows mass uploading of content in CSV format.
You must map each piece of imported content to corresponding fields in Webflow. This may include page content, blog posts, author details, etc.
When migrating images from WordPress to Webflow, it's crucial to consider potential compatibility issues with Webflow's image optimisation features. The best way to do it is by downloading the images from WordPress. Then, upload the images to Webflow's asset manager and re-link to the corresponding content.

To maintain your SEO ranking, you must set up 301 redirects from your old WordPress URLs to the new Webflow URLs. When you change your website's structure or move to a new domain, search engines may initially interpret these changes as broken links. 301 redirects tell search engines and visitors that your site's content has permanently moved to a new location.
If you need to redirect a page:
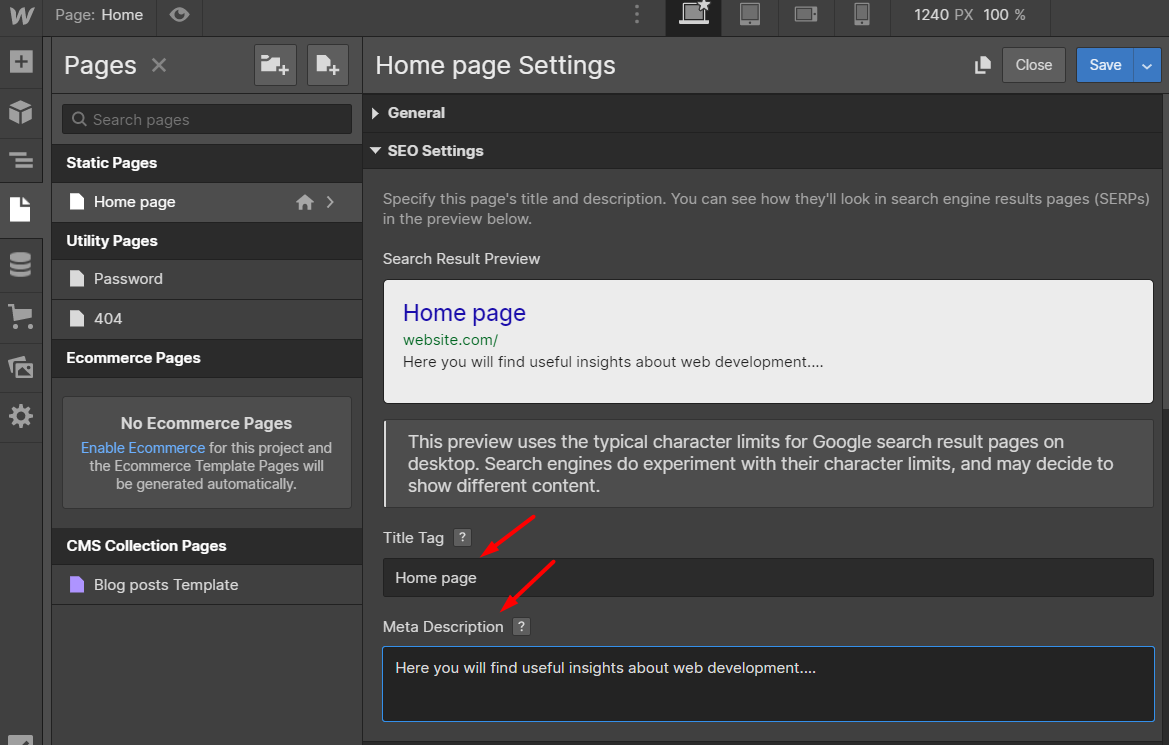
Meta titles and descriptions are key SEO elements that should be transferred to the Webflow site for each corresponding page.
To update the SEO settings for a specific page in your project, follow these steps:
Alt tags are used to describe images to those who can't see them and to help search engines understand their content. Webflow makes alt tagging images straightforward. To add an 'Alt' attribute to an image:
Webflow also allows you to set dynamic alt text for images:
This method makes it easier and ensures that your image alt text will show up in the source code, unlike on some other platforms like WordPress.
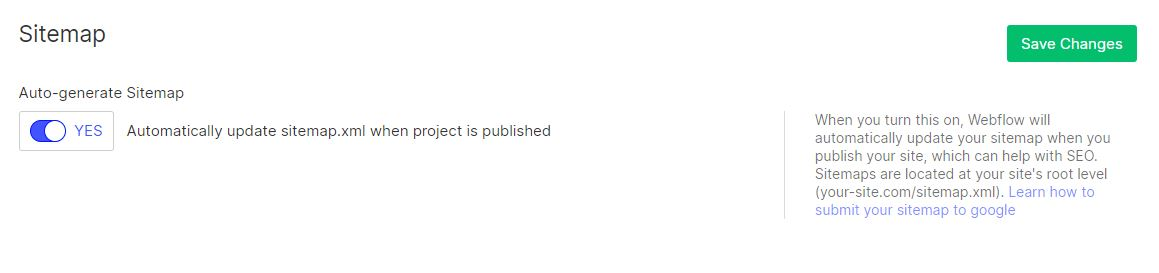
The robots.txt file and sitemaps are essential components for guiding search engine crawlers. A robots.txt file tells crawlers which pages to ignore, while a sitemap provides a roadmap for your website.
In Webflow, setting up an auto-generated sitemap is easy. Here's how:
Finally, point your domain name to your new Webflow site by updating the DNS settings with your domain registrar.
Post migration involves thorough testing, adjustments, and the exciting step of launching your new Webflow site.
Check all links, images, forms, and other elements to ensure they work correctly. Use various devices and browsers for comprehensive testing.
Based on your testing, make any needed adjustments or fixes. Ensure your site looks and performs as expected.
Once you've made the necessary adjustments and are satisfied with your new Webflow site, it's time to reveal it to the world. Publishing your site makes it live and accessible to users. It marks the successful completion of your migration journey.
After your site is live, you need to monitor it continuously. Use tools like Google Analytics to track performance and make necessary adjustments based on the data. This could involve tweaking design elements, altering page structures, or updating content to optimise the user experience and site performance.
The migration process, while organised and detailed, can pose challenges. They may include:
This is where RCCO can ensure an efficient and effective migration with our comprehensive understanding of both the WordPress and Webflow platforms.
Our experts handle every detail of the process, from pre-migration analysis to post-migration monitoring, to ensure a seamless and hassle-free transition to Webflow. Entrusting your migration to RCCO can help you avoid common pitfalls and focus on what matters most—your business.
While we've outlined the primary steps involved in the migration process, there are several additional considerations to keep in mind that can ensure a more seamless transition from WordPress to Webflow. Here are some crucial tips:
Before initiating the migration process, it's vital to create a complete backup of your WordPress site. This acts as a safety net that allows you to restore your website to its current state in the event of any unforeseen issues or data loss during the migration. You can use various plugins, like UpdraftPlus or BackWPup, to easily create backups.
While we've provided an overview of the migration process, your website might have specific needs and complexities. Therefore, creating a detailed, personalised migration plan can be extremely beneficial.
Consider your website's structure, content types, SEO elements, and custom functionality. Creating a plan tailored to these aspects can ensure a smoother migration.
Moving a website from one platform to another can sometimes result in broken links, especially if the URL structures of the two platforms differ. After you complete the migration process, running a thorough check for any broken links on your new Webflow site is essential. You can use tools like Broken Link Checker or Dead Link Checker to aid in this process.
Although it's possible to handle a website migration independently, it can be time-consuming and complex. Hiring professionals like RCCO can alleviate much of the stress associated with migration.
RCCO possesses the technical expertise and experience to ensure a smooth transition and help you focus on your business while we handle the complexities of the migration. We can address any potential challenges proactively to ensure your new Webflow site functions optimally and efficiently from day one.
Navigating the path from WordPress to Webflow may seem like a daunting journey. Yet, with the right guidance, tools, and support, it becomes a journey of transformation and growth. As we've explored, migrating your website is more than a simple data transfer. It's an opportunity to reshape your digital presence, enhance your website's performance, and truly embody your brand's vision in an online space.
There's no denying the potential challenges along the way. However, these can be effectively mitigated with the right expertise and care.That's where the Webflow experts at RCCO come in as your trusted partner for your Webflow migration. We'll ensure your transition is smooth, efficient, and transformative for your online presence.
So, if you're ready to make the leap from WordPress to Webflow, RCCO is ready to guide you every step of the way. Turn your migration into a revitalising journey for your website and brand today.